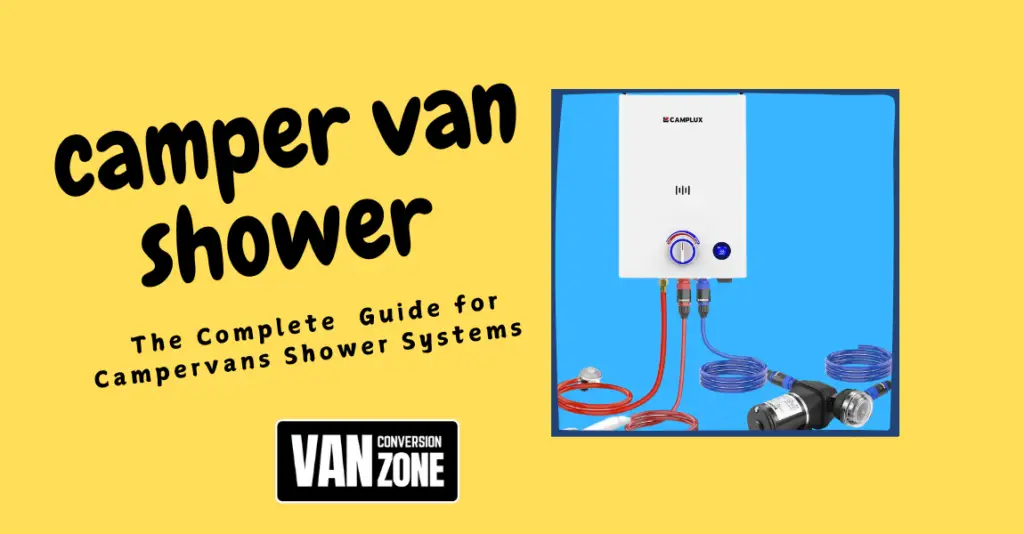
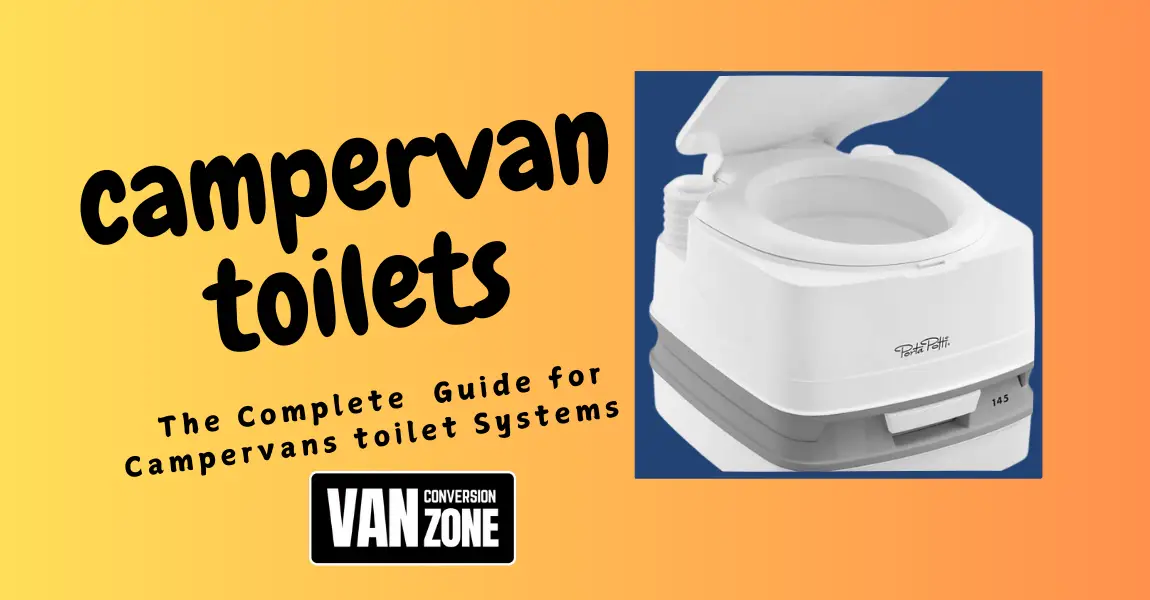
When you’re hitting the open road in your campervan or motorhome, comfort and convenience can make all the difference in your travel experience. One must-have for any van lifer or motorhome enthusiast is a good toilet setup. A quality toilet for your campervan or motorhome is essential, and chemical toilets are a popular pick because they’re portable, efficient, and easy to use—but with so many chemical toilet options out there, how do you figure out which one’s right for you?
Types of Toilets Available for Campervans
Types of Toilets : Pros and Cons
Choosing the Right Campervan Toilet
Tips for Installing a Chemical Toilet in Your Campervan or Motorhome
A Guide for Installation for Each Type of Toilet
How to Empty and Clean a Portable Toilet
Tips for Maintaining Your Portable Toilet
Why Chemical Toilets are a Must-Have for Van Life
This guide breaks down the different types of chemical toilets for campervans and motorhomes, comparing their features, pros, and cons. By the end, you’ll know exactly which toilet works best for your needs—and how to set it up and maintain it for stress-free adventures.
Types of Toilets Available for Campervans
When it comes to campervan toilets, there are numerous options to suit different preferences, lifestyles, and budgets. Here are the most common types of toilets available:
- Cassette Toilets: Built-in toilets in motorhomes and campervans connect a fixed bowl to a removable waste cassette, offering convenience, hygiene, and features like flushing systems for added comfort.
- Compost Toilets: Compost toilets are eco-friendly, chemical-free systems that use natural processes to break down waste. They separate liquids and solids to reduce odor and are ideal for off-grid living, though they require regular maintenance.
- Portable toilets: , or “porta potties,” are compact and lightweight, perfect for small campervans. They feature a detachable waste tank for easy cleaning, making them budget-friendly and great for short trips.
- Bucket toilets : are a basic, affordable option for campers, requiring minimal setup and often paired with liners or sawdust for waste management.
Each type of toilet has its distinct pros and cons, so understanding your specific needs and available space will help determine the best choice for your campervan.
Types of Toilets : Pros and Cons
When deciding on the right toilet for your campervan, it’s essential to consider your preferences, lifestyle, budget, and available space. Below is a detailed description of the most common campervan toilet options, along with their pros and cons.
1. Cassette Toilets
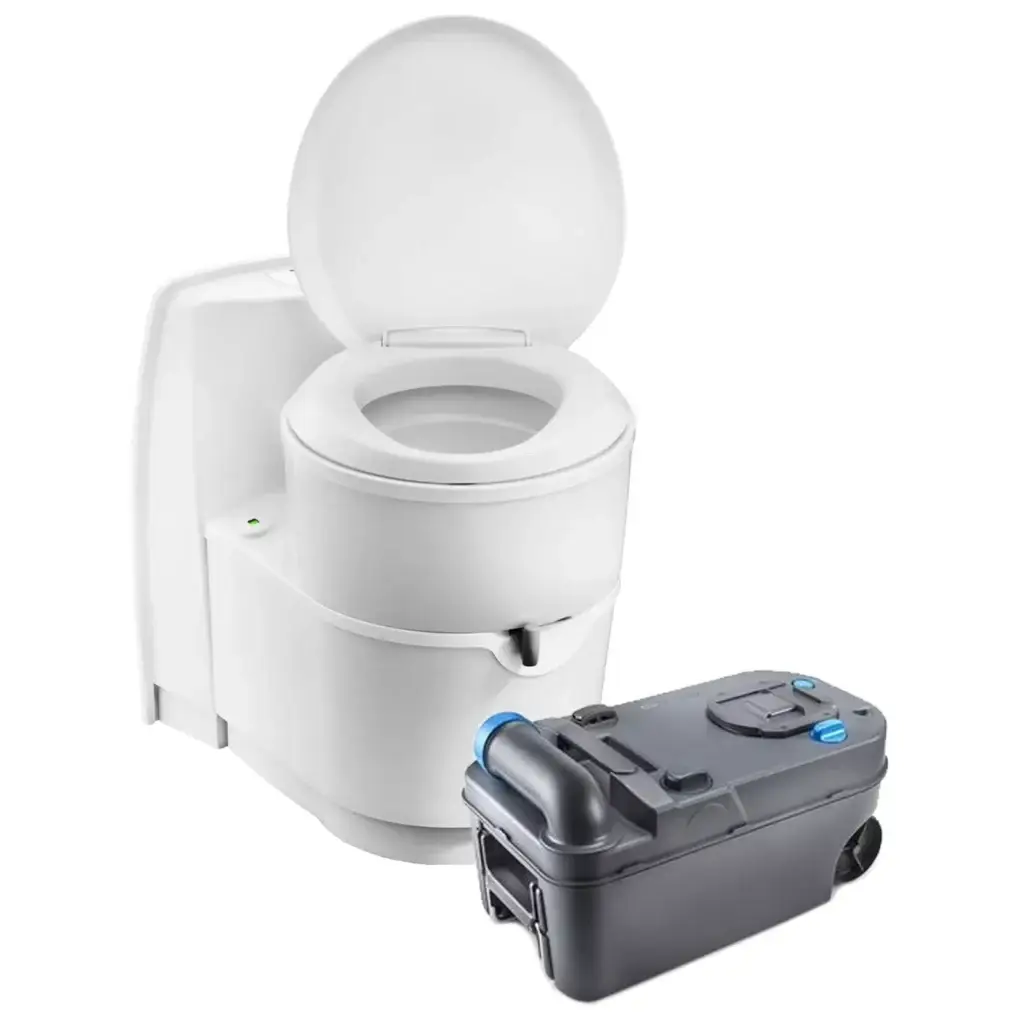
Cassette toilets are a built-in option commonly found in motorhomes and larger campervans. They consist of a fixed toilet bowl connected to a removable waste cassette, which can be accessed from the outside of the vehicle for emptying. These toilets often include flushing systems for added comfort and hygiene.
Key Features:
- Cost: £75-300
- Waste Capacity: 15-20 liters
- Water Per Flush: 0.5-1 liter
- Maintenance: Medium; involves adding chemicals and regular emptying.
- Power Source: None
Pros:
- Convenient and hygienic, with a fixed setup.
- Easy to empty via the removable waste cassette.
- Often comes with built-in flushing systems, adding a home-like experience.
- Suitable for families or long-term travelers.
Cons:
- Requires installation, so it’s less portable and may not be ideal for smaller campervans.
- Can be more expensive than portable options.
- Waste tanks need regular emptying, and finding dedicated disposal points can sometimes be inconvenient.
2. Compost Toilets
Compost toilets are an eco-friendly alternative that relies on natural processes to break down waste. These toilets separate liquid and solid waste to reduce odor and facilitate composting. They are chemical-free and ideal for off-grid travelers who prioritize sustainability.
Key Features:
- Cost: £500-1,000
- Waste Capacity: 30-60 uses (solid waste)
- Water Per Flush: None
- Maintenance: Low; involves adding bulking agents and occasional emptying.
- Power Source: Requires ventilation, which may need a small fan
Pros:
- Environmentally friendly and chemical-free.
- Reduces odor by separating liquid and solid waste.
- Doesn’t require access to water or flushing systems.
- Suitable for off-grid or remote camping.
Cons:
- Requires frequent maintenance and proper waste management.
- Can be more expensive upfront compared to other options.
- Solid waste requires proper composting or disposal, which may not be practical for all users.
- Bulkier than some portable toilet options.
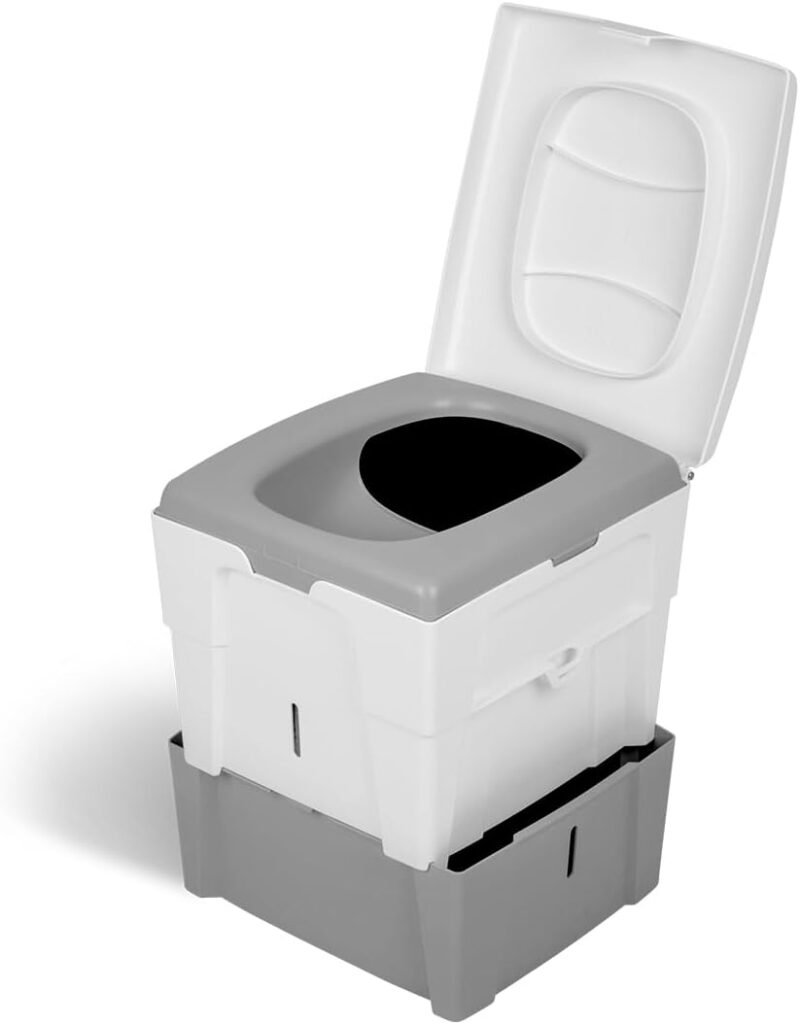
3. Portable Toilets
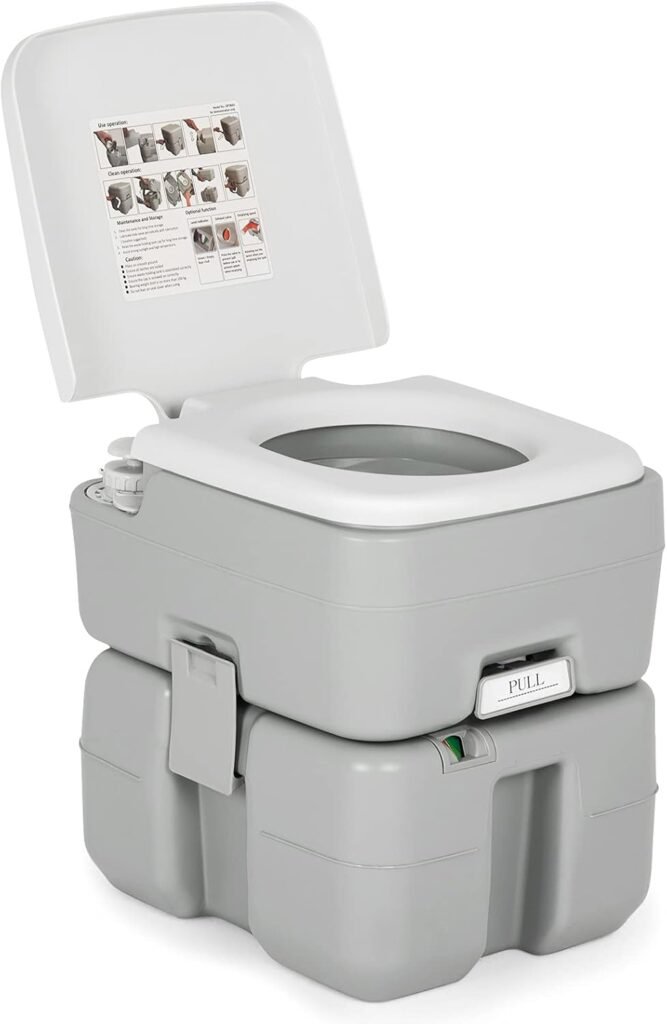
Portable toilets, often called “porta potties,” are compact, lightweight, and easy to move around. They consist of a small bowl and a detachable waste tank, making them versatile and ideal for smaller campervans or short trips.
Key Features:
- Cost: £75-300
- Waste Capacity: 15-20 liters
- Water Per Flush: 0.5-1 liter
- Maintenance: Medium; involves adding chemicals and regular emptying.
- Power Source: None
Pros:
- Lightweight, compact, and easy to transport.
- Budget-friendly option compared to built-in systems.
- Quick and simple to set up, requiring no installation.
- Ideal for short trips or occasional use.
Cons:
- Waste tanks need to be emptied regularly, which can be unpleasant.
- Limited capacity, making them less suitable for long trips.
- May not offer the same comfort or features as built-in toilets.
4. Bucket Toilets
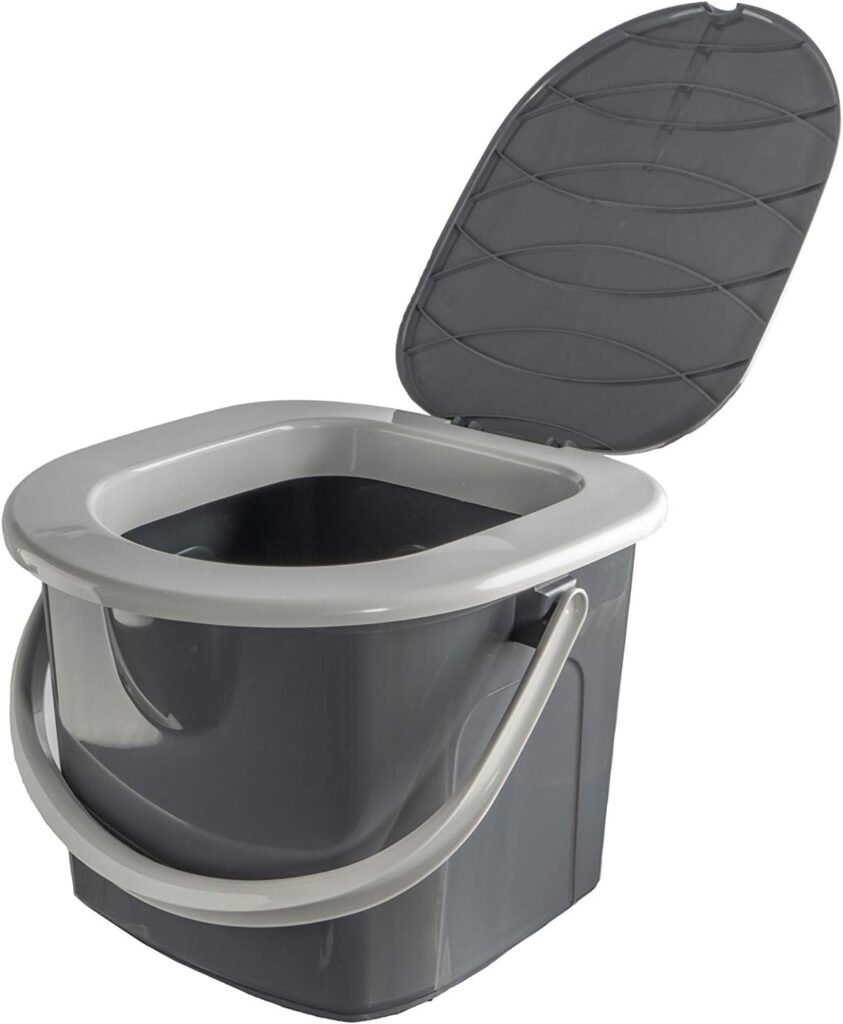
Bucket toilets are the most basic and cost-effective option. They are essentially a bucket with a seat and often use liners or sawdust to manage waste. While simple, they get the job done for campers who need a no-frills solution.
Key Features:
- Cost: £10-50
- Waste Capacity: 5-10 liters
- Water Per Flush: None
- Maintenance: Low; requires regular emptying and cleaning.
- Power Source: None
Pros:
- Extremely affordable and easy to set up.
- Simple to use and requires minimal maintenance.
- Works well for campers on a tight budget or short trips.
- Can be paired with liners or sawdust to manage waste and reduce odor.
Cons:
- Offers little to no comfort or luxury.
- Requires frequent emptying and proper waste disposal.
- Not suitable for extended trips or families.
- Odor control can be challenging without proper liners or absorbents.
Choosing the Right Campervan Toilet
Choosing the right toilet for your campervan depends on your needs. Cassette toilets offer convenience, composting toilets are eco-friendly for off-grid travel, portable toilets are practical, and bucket toilets are budget-friendly. Consider your space, priorities, and budget to find the best fit for your adventures.
Tips for Installing a Chemical Toilet in Your Campervan or Motorhome
- Empty and clean the waste tank regularly to prevent odours and bacteria buildup
- Use biodegradable chemicals whenever possible
- Keep extra toilet paper and hand sanitizer on hand
- Use a separate container or bags for feminine hygiene products
- Store your portable toilet in a cool, dry place when not in use to avoid mould and mildew growth
- If using your portable toilet frequently, consider purchasing a backup waste tank to switch out while the other is being emptied and cleaned. This will save time and prevent interruptions during use.
And that’s it! With these tips, your chemical toilet will be good to go, so you can focus on enjoying your adventures.
A Guide for Installation for Each Type of Toilet
Installing an RV or camper toilet can vary depending on the type you choose. Here’s a step-by-step guide to help you set up each toilet type smoothly and easily.
Installing a Cassette Toilet
- Pick the Perfect Spot: Find a location near an external wall so you can easily access the waste cassette when it’s time to empty it.
- Prep the Area: Make sure the space is clean and free of anything that might get in the way.
- Attach the Toilet: Secure the mounting brackets to your campervan’s floor or wall using screws. Double-check that it’s level and sturdy—it’s got to stay put!
- Hook It Up: Follow the manufacturer’s instructions to connect the freshwater supply and waste system. Use a hose or pump, and you’re good to go.
- Add Chemicals & Ventilation: Toss in the recommended tank chemicals for odor control, and consider installing a ventilation pipe to keep smells at bay.
- Give It a Test Run: Take a short drive to make sure everything’s secure, and check for leaks. Tweak anything that needs adjusting.
Installing a Portable Toilet
- Pick a Spot: Choose a spot that’s easy to access but out of the way—maybe a corner of your campervan or even outside under an awning.
- Secure It: Use any mounting brackets provided, or strap it down with bungee cords to keep it from tipping while you’re on the move.
- Connect the Waste Tank: Attach the detachable waste tank securely so it’s easy to remove when it’s time to clean or empty it.
- Add Chemicals: Pour in the recommended treatment to control odors and break down waste. Follow the manufacturer’s guidelines for best results.
Installing a Bucket Toilet
- Find a Spot: Choose a private and stable spot, either inside your campervan or outside.
- Prep the Bucket: Line the bucket with a heavy-duty, biodegradable trash bag to collect waste.
- Add Some Absorbent Material: Sprinkle sawdust, kitty litter, or peat moss at the bottom of the bag. It’ll help keep odors down and absorb moisture.
- Attach a Seat: Pop on a compatible toilet seat for comfort and convenience.
- Dispose Properly: Once you’re done, tie up the bag securely and dispose of it at an appropriate waste site.
Installing a Compost Toilet
- Choose the Right Spot: Look for a well-ventilated area, ideally near an exterior wall for easy ventilation setup.
- Set Up Ventilation: Follow the instructions to install the ventilation system. This will keep odors in check and help the composting process.
- Secure the Toilet: Use brackets or screws to fix the toilet firmly in place. Make sure it’s level and stable—it shouldn’t wobble.
- Add Composting Material: Pour a layer of composting material, like coconut coir, sawdust, or peat moss, into the composting chamber to get things started.
- Hook Up the Liquid Diverter (if needed): If your compost toilet separates liquids, connect the diverter to a separate container as per the instructions.
- Test It Out: Check that the ventilation and composting systems are working smoothly. Adjust if needed, and you’re all set!
How to Empty and Clean a Portable Toilet
1. Find a Dump Station
Look for designated waste disposal points at campgrounds or caravan parks.Some petrol stations or motorway service areas may also have these facilities.
If you’re camping in a remote area, use a portable waste tank with wheels, which can be emptied at a disposal point later.
- Some gas – petrol stations or rest stops may also have these facilities.
- If you’re camping in a remote area, use a portable waste tank with wheels, which can be emptied at a dump station later.
2. Remove the Waste Tank
- Put on gloves and follow proper sanitary precautions.
- Carefully remove the waste tank from your portable toilet.
- Transport it safely to the dump station.
3. Empty and Clean the Tank
- Follow the manufacturer’s instructions for emptying the waste tank.
- Clean the tank thoroughly, using a rinse spout if available.
- Ensure the tank is fully cleaned before reattaching it to the toilet.
4. Sanitize Your Toilet
- Use disinfectant wipes or spray to sanitize the interior of the portable toilet.
- Wipe down any surfaces that may have come into contact with waste during the process.
- Make sure the toilet is fully cleaned before using it again.
Tips for Maintaining Your Portable Toilet
- Empty and clean the waste tank regularly to prevent odours and bacteria buildup
- Use biodegradable chemicals whenever possible
- Keep extra toilet paper and hand sanitizer on hand
- Use a separate container or bags for feminine hygiene products
- Store your portable toilet in a cool, dry place when not in use to avoid mould and mildew growth
- If using your portable toilet frequently, consider purchasing a backup waste tank to switch out while the other is being emptied and cleaned. This will save time and prevent interruptions during use.
Chemicals Used in Portable Toilets
While there are many different chemical treatments available for chemical toilets, they generally fall into two categories: biodegradable and non-biodegradable. Biodegradable chemicals break down waste naturally, making them more environmentally friendly. Non-biodegradable chemicals may be more effective at controlling odours, but can have negative impacts on the environment.
Why Chemical Toilets are a Must-Have for Van Life
Regardless of the type you choose, chemical toilets are a game-changer for campervan and motorhome enthusiasts. Here’s why:
- Convenience: No need to rely on public restrooms or campsites. A toilet onboard ensures you’re covered wherever you go.
- Hygiene: Self-contained waste management keeps your vehicle clean and sanitary.
- Flexibility: With portable options, you can go off-grid without sacrificing comfort.
- Eco-Friendly Travel: Using the right chemical additives and correct waste disposal methods can reduce your environmental impact.
Choosing the Perfect Chemical Toilet for Your Adventures
The right chemical toilet can make or break your on-the-road experience. Whether you’re a van lifer seeking a compact, portable option or a motorhome owner craving the convenience of a larger cassette toilet, there’s a perfect fit out there for you.
Think about what matters most—space, budget, ease of use—and explore your options. Don’t be shy to ask fellow travelers for their go-to recommendations. After all, finding the right toilet isn’t just a purchase—it’s a game-changer for life on the move!